OIDC support in nixbuild.net
nixbuild.net now supports OpenID Connect (OIDC)!
This means that you can create auth tokens that are only usable if you also can provide an OIDC JWT signed by a specific identity provider. In practice, you can now configure your GitHub Actions workflow with a nixbuild.net auth token that can only be used from within GitHub’s infrastructure. You can even lock it down to specific GitHub repositories. This is a great step forward in securing nixbuild.net’s authentication and authorization.
This new feature is not specific to GitHub, but can be used together with any OIDC provider. Additionally, it is implemented on top of the existing Biscuit support in nixbuild.net. This further validates the usefulness and flexibility that nixbuild.net’s Biscuit policies provide.
Read on to find out exactly how it all fits together!
A Usage Example
Let’s illustrate how OIDC works in nixbuild.net by working our way through a complete usage example. The repository used in this example is available for inspection at GitHub.
Our objective is to configure a GitHub Actions workflow that uses nixbuild.net to perform Nix builds. We want to make use of OIDC to secure the nixbuild.net authentication and avoid the impact a workflow auth token leak could have.
We have three steps to go through:
Create a new nixbuild.net auth token with the base permissions needed for our GitHub workflow.
Derive a new token from the original one, with a Biscuit policy that takes the OIDC context into account. This process is called attenuation and is done offline from nixbuild.net, on your local computer. Arguably, the nixbuild.net UI could offer a way to attach a Biscuit policy directly during token creation, but there is no such functionality yet.
Create a GitHub Actions workflow that requests an OIDC JWT from GitHub and passes it on to nixbuild.net.
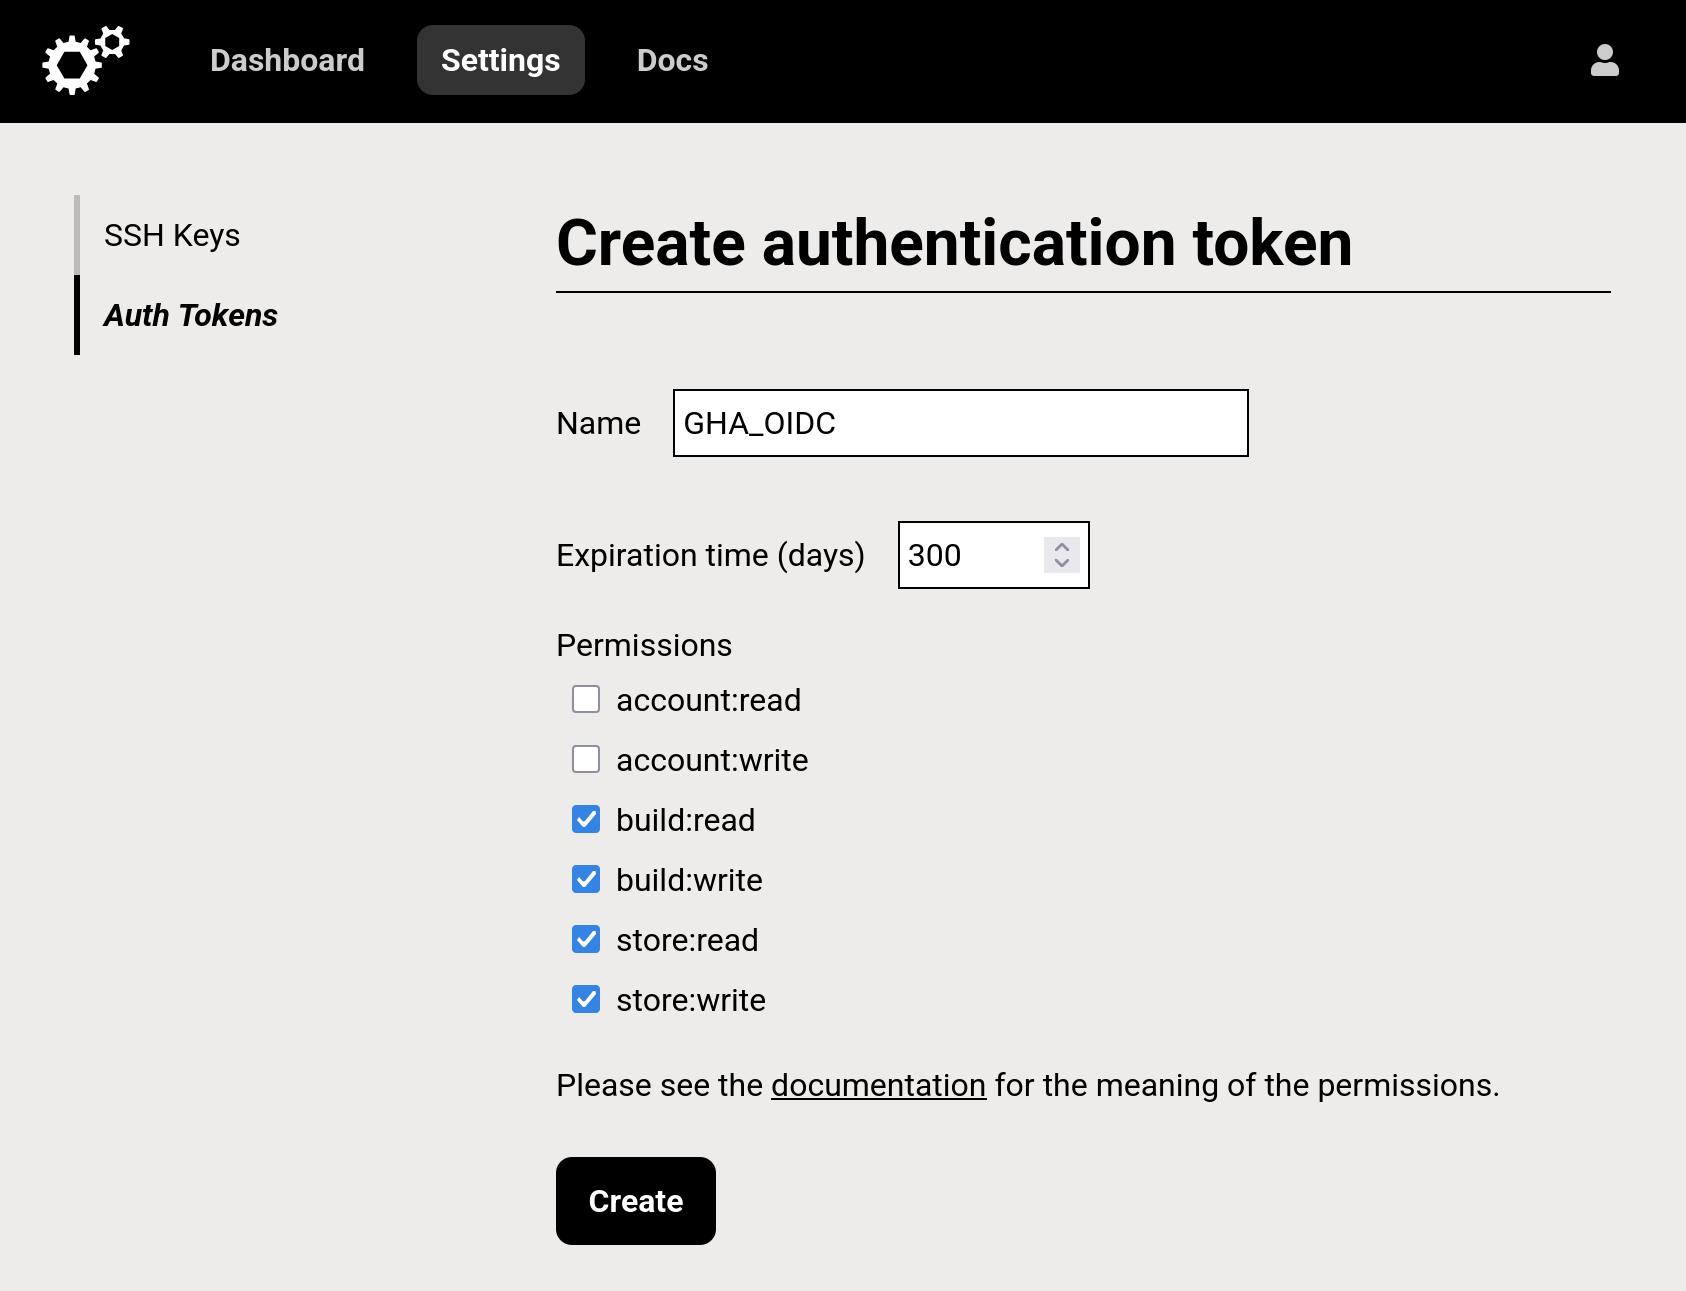
Step 1: Create a Base Token
Create a new nixbuild.net auth token using the nixbuild.net admin shell or the
web UI. This token defines the
“upper limit” of what our workflow can do on nixbuild.net. Since you probably
want your workflow to be able to run builds on nixbuild.net, add the permissions
build:read, build:write, store:read and store:write, but leave out
account:read and account:write. You can set the expiration time to whatever
makes sense to you. It is possible to set a shorter expiration time on the
attenuated token (next step) if you like.
The token generated in this step can be kept entirely offline, and you can then derive new tokens from it whenever you like. Or, you could simply throw away this base token once you have created an attenuated token. Just remember to not revoke the base token in nixbuild.net because that will implicitly revoke all derived tokens too.
If you use the web UI, creating the token should look something like this:
The created token is a long string of randomly-looking characters. Store this string to a file on your computer and treat it as a secret. If anyone gets their hands on it, they will be able to run builds on nixbuild.net, possibly incurring costs to your account.
Step 2: Attenuate the Base Token
Now we want to create a token with more restrictions than the base token. This restricted token will be used by your GitHub workflow. The process of creating a new token from an existing one is called “attenuation”, in Biscuit lingo.
To perform attenuation you need the Biscuit CLI tool, biscuit-cli. It is
available in nixpkpgs:
$ nix shell nixpkgs#biscuit-cliYou can use this tool to inspect your base token (stored in the file
base.token in this example):
$ biscuit inspect base.tokenIn the printed output you should be able to see the permissions and expiration time that you selected during token creation.
Now we’ll write a Biscuit authorization
policy
that restricts token usage to only work from within GitHub Actions workflows
for the nixbuild/nixbuild-oidc-auth-example repository:
check if
  jwt_claim("iss", "https://token.actions.githubusercontent.com");

check if
  jwt_claim("sub", $sub),
  $sub.contains("repo:nixbuild/nixbuild-oidc-auth-example");
We add two check statements, which say what must hold true for
authorization to succeed. jwt_claim refers to a Biscuit
fact that is added by
nixbuild.net if it has been provided an OIDC JWT and been able to verify the
signature of the JWT. We’ll talk more about how the JWTs are passed to
nixbuild.net in the next section.
nixbuild.net will not add all JWT claims as Biscuit facts, since it would
make the authorization process computationally more expensive. But it adds the
iss and sub claims, which are used above. In our policy, we first verify
the iss claim. When nixbuild.net receives a JWT with an iss claim, it will
use OIDC
Discovery to find
out which endpoint to ask for public keys to perform JWT verification. This is
what makes the OIDC support in nixbuild.net generic. You could even host your
own identity provider, as long as it supports OIDC Discovery.
So, when our policy checks that the iss claim is
https://token.actions.githubusercontent.com, we can be sure that the provided
JWT was issued by
GitHub.
Furthermore, in GitHub’s reference
documentation
we can see that the sub claim will include the owner and name of the repo
that created the OIDC JWT. We use that information to write our second policy
check. GitHub encodes more information in the sub claim that can be useful
for authouring Biscuit policies. Check out their documentation for details!
Also be sure to read through the Biscuit language
documentation to find out
what functions and operators you can use in your policies! There is also a
helpful Bisuit
playground
available.
Finally, we save our policy to a file (gha-oidc.biscuit in this example) and
then use the Biscuit CLI to attach the policy to our base token, creating a
new, attenuated, token:
$ biscuit attenuate --block-file gha-oidc.biscuit base.token > gha-oidc.tokenIf you run biscuit inspect gha-oidc.token you should see that it includes our
new policy.
Lets do a quick sanity check to see that the token actually can’t be used
outside GitHub. We do this by performing a HEAD request against the /builds
endpoint of the nixbuild.net HTTP API, once with the base token and once with
the attenuated token:
$ curl -sIH "Authorization: Bearer $(cat base.token)" https://api.nixbuild.net/builds
HTTP/2 200
server: nginx
date: Thu, 28 Aug 2025 09:31:47 GMT
content-type: application/json;charset=utf-8

$ curl -sIH "Authorization: Bearer $(cat gha-oidc.token)" https://api.nixbuild.net/builds
HTTP/2 403
server: nginx
date: Thu, 28 Aug 2025 09:32:02 GMT
Looks good! Now lets see how to use the token in an actual GitHub Actions workflow.
Step 3: Create a GitHub Workflow
The action nixbuild/nixbuild-action is the preferred way of configuring nixbuild.net in GitHub Actions workflows, and since v21 it supports generating an OIDC ID Token and passing it on to nixbuild.net automatically.
Here is a simple workflow that does this:
name: oidc-test

on: push

jobs:

  oidc-example:
    runs-on: ubuntu-latest
    permissions:
      id-token: write
      contents: read
    steps:
      - name: Install Nix
        uses: nixbuild/nix-quick-install-action@v33

      - name: Configure nixbuild.net
        uses: nixbuild/nixbuild-action@v21
        with:
          nixbuild_token: ${{ secrets.nixbuild_token }}
          oidc: true

      - name: Run a simple test build on nixbuild.net
        run: |
          export DRV_SEED="$RANDOM$RANDOM"
          nix build github:nixbuild/nixbench#write-one-file \
            --impure \
            --eval-store auto \
            --store ssh-ng://eu.nixbuild.net \
            --print-build-logs
The important pieces are the id-token: write permission (allows OIDC ID
Tokens to be fetched from GitHub), the oidc: true setting for
nixbuild/nixbuild-action (enables the mechanism that fetches and passes OIDC
ID Tokens on to nixbuild.net) and the nixbuild_token secret (should be set to
the attenuated Biscuit token).
The above workflow is all it takes to integrate GitHub’s OIDC with
nixbuild.net. If you are using some other OIDC Provider, or if you’re not
using nixbuild-action you should pass in your OIDC ID Token to nixbuild.net
by setting the SSH environment variable (or HTTP header, if you’re using the
HTTP API) named NIXBUILDNET_OIDC_ID_TOKEN. The OIDC ID Token should have
the audience nixbuild.net.